How To Fix A Bike Puncture In 9 Simple Steps
A lot of things don’t go to plan when you’re on a bike ride – as an insurance company, we understand this as much as anyone.
All it takes is for you to cycle over glass, flint, or thorns, and your ride could be cut short by a puncture. And if you don’t know how to fix this puncture, you could become stranded in the middle of nowhere and end up paying a load of money to get it fixed.
However, with our simple guide, you’ll be back on the road in no time without having to dip your hand into your pocket.
Here’s how to fix a bike puncture in 9 easy steps.
Table of contents
1. Remove the wheel
2. Deflate the tyre
3. Remove the inner tube
4. Identify the cause of the puncture
5. Remove the objects
6. Patch up the hole
7. Inflate the tube
8. Put the tyre back on
9. Inflate your tyre
The tools you’ll need
Here are some of the essential tools you need to fix a bike puncture:
You can get puncture repair kits from a range of retailers. Check out this article on the best bike puncture repair kits on the market to decide which kit is best for you.
How to fix a bike puncture
Now that you’ve got the tools you need to fix a bike puncture, let’s look at the steps you need to take to actually fix it.
1. Remove the wheel from your bike
You can remove the affected wheel (or wheels) by releasing the brake cable and then undoing the quick-release lever. Undo the lever by pulling it – this will open the lever and allow you to take your wheel off.
If your bike has caliper brakes, simply open the quick release. If it has disc brakes, open the quick release skewer or thru axle to remove your bike’s wheel from the frame.
If your rear wheel is the one that’s sustained a puncture, you should adjust the gears so that your bike is in the smallest sprocket before you start pulling back the derailleur. The below video explains this process in more detail.
2. Deflate your tyre
This next step is hopefully self-explanatory, but make sure you release any excess air from the affected tyre before you do anything else – there may still be some left, even if you’ve had a puncture.
If your bike has a dust cap, remove this. You should also push the valve to fully deflate your tyre’s tube if it’s not already empty. If your bike contains Schrader valves, press down the pin in the middle of the valve to release trapped air, but if it contains Presta valves, unscrew the locknut you see at the end of the valve and then press it in.
This helpful article explains the differences between the two types of valves if you’re unsure.
3. Remove the inner tube
This balloon-like structure of your bike can be removed by inserting a tyre lever under the bead of your tyre. Apply some pressure to it, and you’ll notice that this should elevate one side of the tyre above the rim of your wheel.
Take the second tyre lever, move it along another six or so inches, and do the same thing. Once you’ve done this, you should be able to run one of the two levers along the entire circumference of your bike’s wheel, thus allowing you to pinch the tube and pull it out.
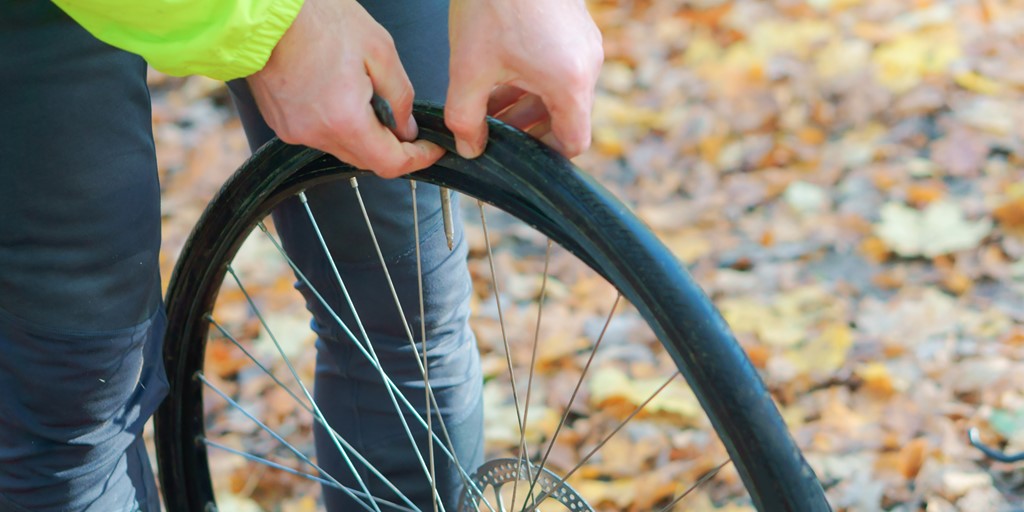
4. Identify the cause of the puncture
By now, you’ll be able to get a good look at your tube and (eventually) find out where the puncture is.
This stage is when you’ll need your bike pump, as alluded to above. To identify the cause of puncture, pump some air into the tube, listening out for any hissing sounds where the air is escaping. You should be able to hear something, but even if you don’t, you should still be able to see where the tube is split. This will tell you where the puncture is. Make sure you mark where the puncture is so that you don’t forget – a marker pen will do the trick, or you can use the chalk from your puncture repair kit.
If you’re really struggling to find the puncture, simply run your fingers around the inside of your tyre until you feel a split. But be careful if you do this, as the object could be sharp. This ties in with our next point.
5. Remove any object(s) that caused the puncture
Again, this tip should be a given, but if you find the object that’s caused your flat tyre, it needs to be removed immediately.
However, be careful if you’re removing a shard of glass, nail, thorn, or some other sharp object from your tyre.
Whatever it is that’s caused your flat tyre, make sure all traces of the have been removed before you follow the next few steps – otherwise, all your hard work has been for nothing! After all, shards of glass on the outside of your bike’s tyre can work their way through the rubber if they’re not removed straight away.
6. Patch up the hole
Here’s where you’ll use your puncture repair kit, as mentioned in the first section of this article.
Using a small piece of sandpaper, roughen the surface of the tube around where the hole is located.
Next, apply the glue to the tube. It’s very important that you only use a small amount of glue – it should ideally be about the size of a small pea. Spread the glue with your finger to form a thin layer over the tube.
Wait around five minutes for the glue to dry, before peeling the silver foil off one of your patches. Place the patch over the area where the hole is located – you want the patch to be as central as possible. Press it down firmly for around a minute, leave it for a couple of minutes to set, and then take the plastic off.
This video from Global Cycling Network illustrates what we’ve written above. We’ve set the video to start at 2:18 as we’ve already covered the first couple of points that are referenced on it.
7. Inflate the tube
Now it’s time to put your tyre back together, starting with the inner tube.
Inflating your tube will allow you to assess whether the repair is holding and if the patch stretches as you inflate. Add a small amount of air to begin with, and if you notice a hole under an edge of the patch, remove it and repeat step 6.
Once you’re confident that the puncture has been successfully patched over and the tube can hold its shape, you can fully re-inflate it and stick it back in the tyre.
How you inflate your tube depends on the type of valve that’s attached to it. The below video explains more.
8. Put your tyre back on
Starting near the valve, keep the bead of your tyre tight and slide it back onto the rim using your thumbs or fingers.
Pinch the sides of the tyre and make sure that a pinch hasn’t occurred. Go round the whole tyre to make sure it’s slotted back in ok.
Make sure your inner tube ends up inside the tyre and not trapped between the tyre bead and the rim, because this can cause another puncture.
9. Inflate your tyre
The final step is to pump your bike’s tyre up to the correct pressure before putting it back on your bike. You can also refer to the video we included in point 7 if you want to know what pressure you should inflate your tyres to.
Whilst you’re inflating your tyre, you just need to keep checking that your tyre is properly seated onto the rim. If you want to speed things up, you can use a CO2 inflator with CO2 canister.
Once your tyre’s fully inflated, you just need to complete the final four steps:
Put your wheel back on your bike
Tighten the quick-release
Spin your wheel to make sure it spins freely and is correctly fitted to your bike
Make sure the brakes work properly
Once you’ve done the above, your puncture is fixed and you’re good to go!
Specialist cycling insurance from Cycleplan
Our insurance protects you from injury or claims that might be made against you and your bike in the event of theft, damages, or if it’s stolen.
We offer equipment cover for a range of bikes and accessories up to the value of £30,000. We also provide protection such as personal accident cover, public liability, and more.
Find out for yourself what our specialist cycling insurance covers, and get an instant online quote today.