Graco Turn2Me Multimode Car Seat Review
(Last Updated On: July 29, 2022)
Graco Turn2 Me
Rotating car seats were briefly a thing, then not a thing and now they are really a thing. We’ve gone from having zero of these seats on the market to now having a few models to choose from. We’ve reviewed them all (except the Orbit) so I was pleased to have the opportunity to spend some time with the newest entry into this category, the Graco Turn2Me. It offers a fairly easy installation and a plush cover. Plus, it rotates in rear facing mode.
CSFTL Quick Stats
Rear facing weight range: 4-40 poundsRear facing height range: the child’s head must be at least 1 inch below the headrest adjustment handleRear facing lower anchor weight limit: 35 poundsForward facing weight range: 22-65 poundsRecline position 2 or 3 must be used for forward facing children who weigh less than 25 poundsForward facing height range: up to 49 inches tallForward facing lower anchor weight limit: 40 poundsHigh back booster weight range: 40-100 poundsHigh back booster height range: 43-57 inches tallHigh back booster minimum age: at least 4 years old. CSFTL advocates that children be at least 5 years old before moving to a booster seat.LATCH is permitted in booster modeExpiration: 10 years
Measurements
Lowest harness height: 7 inches with padding, 8 inches without paddingHighest harness height: 17 inchesHighest shoulder belt guide height: 18.5 inchesFront to back space in the most reclined rear facing position: roughly 28 inchesWidth at widest point: 19 inchesFront to back space: 28 inchesSeat weight: 26 pounds
Unique Features
The seat rotates in rear facing mode. It does not rotate in forward facing mode.SnugLock installation in both rear and forward facing modesNo rethread harness4 recline positionsEasy-to-read recline angle indicator for rear and forward facing modes2 easy-to-clean cupholders (these are required for use)Steel-reinforced framePremium lower anchor connectorsRemovable, plush head and body inserts for rear facing use (both inserts must be used at the same time)
Comparison of Rotating Car Seats
Now that there are a number of car seats that swivel, we’ve developed a handy chart to help you keep track of some of the primary differences between them.
Car Seats that Swivel: a GuideCar Seat NameRear Facing Weight RangeRear Facing Height RangeRear Facing lower anchor weight limitForward Facing Weight RangeTether UseForward Facing Height RangeForward Facing lower anchor weight limitMSRPEvenflo Revolve4 – 40 pounds17 – 40 inches tall or until the child’s head is within 1 inch of the top of the headrest or backrest, whichever is higher35 pounds22 – 65 poundsRequired in both modes, stays out of the way and can stay attached28 – 49 inches tall and the top of the child’s ears are below the top of the headrest40 pounds$379Graco Turn2Me4 – 40 poundsChild’s head must be at least 1 inch below the headrest adjustment handle35 pounds22 – 65 poundsRequired in forward facing mode, stays out of the way and can stay attached since the seat doesn’t swivel in forward facing mode28 – 49 inches tall and the top of the child’s ears are below the top of the headrest40 pounds$449Cybex Sirona S5-50 pounds17 – 49 inches tall30 pounds22-65 poundsRequired for forward facing in Canada, optional for forward facing in the US, must be attached every time the seat swivels for forward facing28 – 49 inches tall and the top of the child’s ears are below the top of the headrest35 pounds$500Baby Jogger City Turn4-50 poundsUntil the child’s head is 1 inch below the adjuster handle on the headrest when fully extended35 pounds22-65 poundsRequired in forward facing mode, stays out of the way and can stay attached since the seat doesn’t swivel in forward facing modeless than 49 inches tall40 pounds$500NUNA REVV5-40 pounds43 inches tall max30 pounds5-40 poundsRequired in both directions, stays out of the way and can stay attached43 inches tall30 pounds$599
Assembly Required

Installing the Graco Turn2Me cupholders
The Turn2Me includes 2 cupholders that must be attached before using the car seat. Other Graco seats have a similar requirement that’s often missed when caregivers are setting up their child’s car seat so we mention this first nowadays.
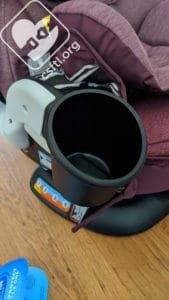
Graco Turn2Me cupholders
Each cupholder is marked L or R, indicating use on the left or right side of the seat. Remove the edge of the cover from around the cupholder area on the seat to expose the installation area, then align the groove on the back of the cupholder with the line on the seat itself, then slide the cupholder into position. The cupholder will click then lock into place once it’s in the right place.
It Rotates

Graco Turn2Me rotation
Now that we have the complex assembly instructions out of the way (install cupholders, done!), let’s talk about the seat’s other big feature: it rotates in rear facing mode to make loading the child easier.
Like the Baby Jogger CityTurn before it, I admit that at first, I wanted this seat to rotate in rear and forward facing modes. However, when it comes to both of these seats, logic prevailed — in most cases, a child whose parents follow best practice and don’t turn their car seat forward facing until somewhere around 3-4 years old, that child can climb into their own car seats. So the rotating feature wouldn’t be as useful for forward facing.
 The Turn2Me rotates quite easily, just squeeze the little button behind the cupholder and gently nudge the shell of the seat in the other direction. It will click when it is in a locked position and it must be in that locked position before beginning to drive. We found that loading our rear facing dolls (who, I admit are rather compliant in all matters, unlike sassy toddlers or squirmy newborns) from the side was quite easy and convenient.I did test the rotation by placing the seat in a variety of weird locations while I was writing this review. Regardless of whether or not the seat was secured in a vehicle, sitting on top of my table, or (don’t ask) sitting on top of my trash can for a moment, I was able to rotate the seat with ease. Obviously, families who use this seat on the regular won’t need to test the rotation like this but I was glad to see that I could rotate it with one hand even when the seat isn’t installed! (OF COURSE it does need to be installed when the car seat is actually being used in a vehicle.)
QR Code

Graco Turn2Me QR code
There’s also a handy QR code on this section of the cover, scan it to view installation videos. FYI scanning a picture of this QR code didn’t work for me but scanning the QR code itself did.
Plush Cover/Fun Colors
Graco Turn2Me
In a world that’s currently dominated by black and gray car seats, the Turn2Me’s plush, purple cover is a welcome change. I know lots of families love their monochromatic car seats (all colors are great, just read and use those manuals for the correct installation and use!) but my kids were young during the heyday of fun patterns — cows, flowers, monkeys, we had it all!– so I welcome the return of a color palette to the car seat world.
Note: this seat is also available in black and gray.
Infant Insert
Graco Turn2Me rear facing inserts
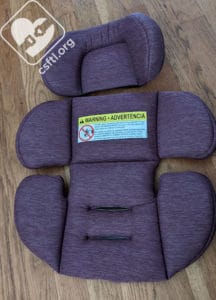
The Turn2Me includes a plush set of inserts for use in rear facing mode. Note: like most inserts, these inserts cannot be used in forward facing mode.

Graco Turn2Me rear facing inserts
These inserts must be used together and they must be used if the child’s shoulders are below the lowest harness position.
Recline Angle Adjuster

Graco Turn2Me recline angle adjuster
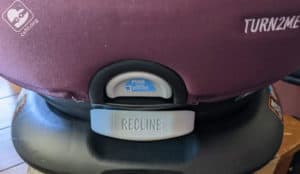
The gray handle that adjusts the recline angle is mounted on the back of the seat’s shell. It adjusts fairly easily, just squeeze, then tilt the seat’s shell until it’s in the desired position, then release. Make sure the seat’s shell clicks into place.
Graco Turn2Me recline angle adjuster — now in the front!
If you’re moving the seat between rear and forward facing modes, there’s an extra step to get the seat into the most upright forward facing position. First squeeze the handle to move the shell into the upright position, then rotate the seat.
Now the very same handle will be at the front of the seat, squeeze it once again and push the shell into the more upright position to move the seat into the most upright position. I’m pretty sure I just made that sound more difficult than it actually is.
Three Across
The Turn2Me’s widest point is 19 inches across, that probably doesn’t make it a great option for three across situations. Where I found that the Baby Jogger City Turn sat up pretty high and was able to rotate next to a lower-set convertible seat because it rotated over that seat, the Turn2Me sits lower and likely wouldn’t play well with convertibles or rear facing only seats that sit higher. Your mileage may vary, but I wouldn’t put the Turn2Me at the top of any list for tight spaces.
Installation
Rear Facing
Recline Angle Indicator

Graco Turn2Me rear facing recline angle indicator
The manual states that the bubble must be completely within the blue zone for proper rear facing use. If needed, rolled towels may be used to install the seat at the proper angle.
Lower Anchors

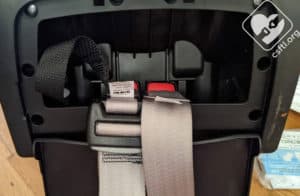
Graco Turn2Me open rear facing belt path
The Turn2Me has Graco’s most premium installation system — SnugLock. We’re big fans of this system, on every other seat with SnugLock, we’ve found that it takes most of the pain out of installing the seats correctly. When it comes to the Turn2Me, we found that it’s a bit tricky in rear facing mode, but in the end, fairly easy to get that secure installation.
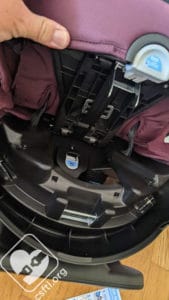
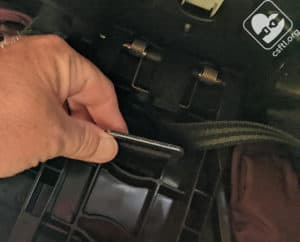
Here’s the scoop: in rear facing mode, the belt path and SnugLock arm are underneath the seat pan. Press the button on the front of the seat to open the panel and expose the SnugLock arm.

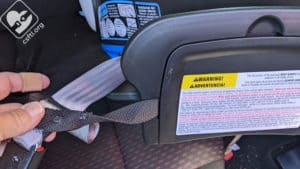
Graco Turn2Me small belt rear facing path
Here’s the tricky part — I found the belt path area to be quite small. So much so that I’d encourage caregivers with larger hands or with arthritis to perhaps choose a different seat (I’m well aware that some will take this as a challenge, there remains no medal for proving me wrong, as always, this is my own experience, your mileage may vary). Here is my own medium-sized hand inside this belt path, please note that it takes up about half of the working area.
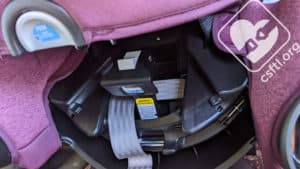
Graco Turn2Me lower anchor storage
The lower anchors store on the front of the seat in a handy compartment. They’re attached to the seat by a benign-appearing piece of webbing that I found oddly difficult to work with — it really really wanted to be in the way no matter what I did.
Graco Turn2Me lower anchor webbing attachment
Here you can see that pesky webbing trying so hard to get in the way of the lower anchor adjuster.
We had words, that webbing and I. Eventually, we made peace and I was able to get it tucked out of the way and continue installing the seat.
Graco Turn2Me rear facing belt path
As I mentioned, the rear facing belt path is quite small so I had to be pretty careful while I was working in there.
Graco Turn2Me rear facing belt path
Once the panel is open, press the release button on the SnugLock arm to open the arm, then thread the lower anchor webbing through the belt path and under the SnugLock arm. Be careful not to scrape your hands on the metal bits that are on the underside of the panel while you’re in there working!
Attach both ends of the lower anchor connectors to the lower anchor connectors in the vehicle, pull the end of the tail of the webbing to remove most of the slack from the connectors, then close the SnugLock panel. Check your work by giving the seat a firm handshake at the belt path — it should move less than an inch in any direction. If the seat still moves, open the panel to expose the belt path, then open the SnugLock arm, push down on the seat while pulling straight up on the webbing to remove a bit more slack, then close the SnugLock arm and check your work again.
Like other seats that have SnugLock, I found that removing most of the slack from the webbing was the most effective way to get a solid installation.
Vehicle Seat Belt

Graco Turn2Me rear facing vehicle seat belt
Installing the Turn2Me with the vehicle seat belt presents the same “working in a small space” challenge that the lower anchors did, only slightly more challenging since you also have to thread the seat belt through the belt path.
The process is the same — press the release button on the front of the seat to open the belt path, raise the SnugLock arm — the difference is the next step — thread the vehicle seat belt through the belt path, under the SnugLock arm, remove the slack from the shoulder portion of the belt, then close the SnugLock and check your work. The seat should move less than an inch at the belt path.
In the end, installing this seat rear facing was not difficult, it was mostly what I’d expect from a seat with SnugLock in the name, the only challenge was working in the small space of the rear facing belt path.
Forward Facing
Note: recline position 2 or 3 must be used for forward facing children who weigh less than 25 pounds. CSFTL advocates that children ride rear facing as long as possible, ideally so long that this restriction would no longer apply.
Angle Indicator

Graco Turn2Me foward facing recline angle indicator
The Turn2Me has a first for Graco — an angle indicator for forward facing use. The manual states that the bubble must be completely within the orange zone for proper forward facing use.
Lower Anchors
Graco Turn2Me forward facing belt path
The Turn2Me does not rotate in forward facing mode. I know I said that earlier but I’m mentioning it again since it’s kind of a big deal. However, it does have SnugLock, which I found made the installation pretty darn simple.
To install the Turn2Me forward facing with the lower anchors, first move the lower anchors from the rear facing belt path into the forward facing belt path. This was a bit more difficult than I’d like, again due to that piece of webbing attaching the anchors to the seat. Once the lower anchors are in place, set the seat on the vehicle seat with the harness facing the front of the vehicle. Raise the headrest all the way up, then unsnap the cover to expose the delightfully open forward facing belt path.

Graco Turn2Me forward facing
Release the SnugLock arm, thread the lower anchors through the belt path and behind the SnugLock arm. Press the Turn2Me away from you, back into the vehicle seat, while pulling the webbing on the lower anchor connectors to remove the slack. Once most of the slack is removed from the webbing, close the SnugLock arm to secure the installation and check your work. The seat should move less than an inch at the belt path.
Vehicle Seat Belt
Graco Turn2Me forward facing vehicle seat belt
To install the Turn2Me forward facing with the vehicle seat belt, first make sure that the lower anchors are stored in their handy storage compartment on the front of the seat. Also make sure that the seat is rotated into the forward facing position, set the seat on the vehicle seat with the harness facing the front of the vehicle. Raise the headrest all the way up, then unsnap the cover to expose the delightfully open forward facing belt path.
Release the SnugLock arm, thread the vehicle seat belt through the belt path and behind the open arm, buckle it in, then remove as much slack as possible from the shoulder portion of the vehicle seat belt — the goal is to get that lap portion of the belt as snug as possible! Hold the belt in place, then close the SnugLock arm. Check your work, the seat should move less than an inch at the belt path.
Fit to Child
Preemie Doll
With Padding
Graco Turn2Me preemie fit
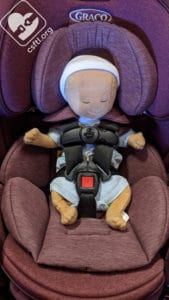
It’s somewhat uncommon for a convertible or multimode car seat to be rated down to 4 pounds so I almost forgot to ask my preemie Huggable Images doll to model the Turn2Me! Here is our delightful 4 pound doll, the doll is 17 inches long. Since the Turn2Me does not have a minimum rear facing height, our doll was the right size to model this seat. Sometimes, we find that the lowest harness position is still not low enough for these tiny passengers but I’m pretty thrilled to tell you that the Turn2Me fit our preemie doll quite well! As always, we’d caution caregivers wanting to use any car seat with a preemie to check the fit before heading out on a ride (make sure the harness is at or below the shoulders and the seat/padding doesn’t push the baby’s head forward).
Newborn Doll
With Padding

Graco Turn2Me newborn doll
Our newborn Huggable Images doll weighs 7 pounds and is 17 inches long. Since the infant padding is optional (but required if the child’s head is below the lowest harness position), we tried our doll in the seat both with and without the padding. With the padding in place, the doll fits well, though the padding does appear to make the doll feel a bit squished in the seat. Our doll wasn’t talking and it’s unlikely that a newborn would either so the decision about whether or not to use the padding falls to the caregiver.
Without Padding
So we tried the doll without the padding in place.
16 Month Old Doll

Graco Turn2Me 16 month old doll
Our 16 month old doll weighs next to nothing and is 31 inches tall. The doll has plenty of room to grow and loading the doll into the seat was a piece of cake, thanks to the rotating seat!
3 Year Old Child

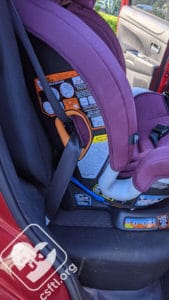
Graco Turn2Me rear facing 3 years old
For the first time since early 2020, I’m thrilled to have actual children sharing their thoughts about some car seats! This 3 year old model weighs 31 pounds and is 38 inches tall. She rides forward facing most of the time these days but was happy to give the Turn2Me a whirl for us.

Graco Turn2Me rear facing 3 years old
She was VERY amused that it rotates and was jazzed about climbing in. Her mom found it pretty easy to do her harness while the seat was rotated. Once we got her harness nice and snug, it was time to rotate the seat. That’s when we discovered that explaining the concept of where your legs should go was oddly challenging. Naturally, her mom figured it out way before I did (“bend your legs. Then leave them bent.”) and we worked through it. I’d imagine that children who start riding in this seat much earlier will sort of figure this out as they grow but it was a small issue during this review. Our model found the seat quite comfortable, it’s not unlike the Graco Milestone she normally rides in, though it’s a bit more plush. She has some room to grow yet in terms of harness height.
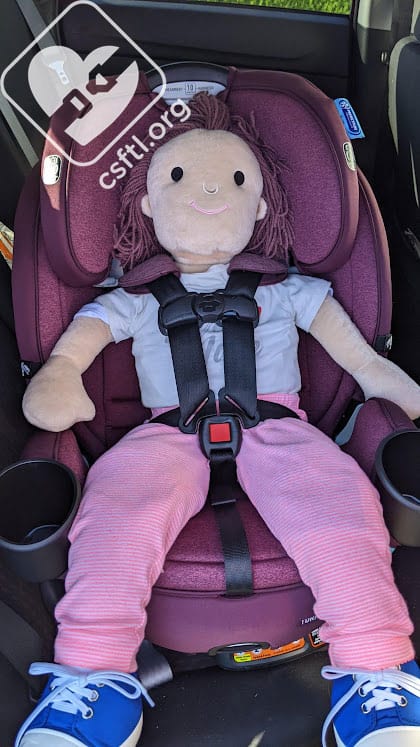
3 Year Old Doll

Graco Turn2Me 3 year old doll
Our 3 year old doll is 38 inches tall and, like our 16 month old doll, full of lightweight fluff. The doll has a bit of room to grow and, unlike our human model, we had no issues moving the fluff-filled legs out of the way to rotate the seat. I do want to know that the Turn2Me’s low-slung rear-facing belt path puts the vehicle seat belt out of the way of the child’s legs. The similar (yet not) Baby Jogger CityTurn’s belt path puts that vehicle seat belt directly in the path of the rotation and we had to be careful that the doll’s legs didn’t catch on the belt. That’s not an issue with the Turn2Me.
Forward Facing
3 Year Old Child
Graco Turn2Me forward facing 3 years old
Our fabulous and funny 3 year old model remains 31 pounds and 38 inches tall. She was able to climb into the Turn2Me without issue and we found that the harness fit her well. She’s got some room to grow yet and she had no complaints about the overall comfort level of the seat, though she did let me know that I shouldn’t call her “kiddo” so that’s been avoided here. We are absolutely at the mercy of our models and I wouldn’t have it any other way.
She’s got some room to grow in this seat and she found it just as comfortable in forward facing mode as she did in rear facing mode.
3 Year Old Doll

Graco Turn2Me 3 year old doll
Here is our 3 year old doll once more, this time the doll was kind enough to model the seat in forward facing mode. The harness fits the doll well and there’s still plenty of room to grow.
6 Year Old Doll

Graco Turn2Me 6 Year Old Doll
Our largest stuffed model is the 6 year old doll, which is 48 inches tall. At this height, the doll is just an inch away from outgrowing the seat by height. That measurement is if you’re just looking at the stated height limit for the seat. We’re mostly looking at seated shoulder height and in this case, the doll is right at the height limit for the harness. Since our doll is 6 years old, we’d expect that there wouldn’t be a lot of growing room left in harness mode.
Booster Mode
Converting to Booster Mode
Graco Turn2Me remove crotch buckle
The Turn2Me converts to a high back booster, it must be in recline position 1 for booster use. To make the transition, first be sure that your kiddo is old enough (ideally, at least 5) and mature enough to sit properly all of the time. Then, with the Turn2Me in forward facing mode, open the lower panel to expose the rear facing belt path. This is the step where the crotch buckle gets stored.
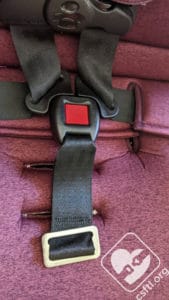
Graco Turn2Me crotch buckle
With the rear facing belt path panel open, push the crotch buckle out through the underside of the panel until it’s loose, then remove it from the seat pan. This took a bit of effort, though it’s nothing like the challenge that was removing the crotch buckle on the early Nautilus/Argos. That remains the most challenging thing I’ve done as a car seat person. Once this crotch buckle is removed, reattach it to the buckle tongues. Attach the chest clip and slide the pieces together.
Graco Turn2Me harness storage
Raise the headrest all of the way and pull down the cover to expose the belt path, then open the harness storage door.

Graco Turn2Me booster mode
Store the chest clip and crotch buckle inside, then close everything back up and you’re ready for booster mode.
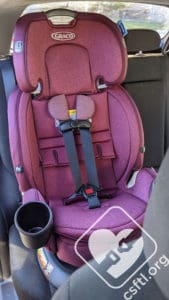
6 Year Old Doll

Graco Turn2Me 6 years old booster mode
Our 6 year old doll saves the day once again by showing the seat in booster mode. The official maximum height for this seat in booster mode is 57 inches tall but the shoulder belt guide is barely taller than the highest harness position so (as always) I’m not sure how those extra inches of height come into play between harness mode (49 inches) and booster mode (57 inches) when there isn’t an 8 inch distance between the top of the harness and the shoulder belt guide.
Anyway, our model is 48 inches tall and has a teeny bit of room to grow in booster mode. We’ve long considered booster mode on multimode seats as a transitional option since they don’t tend to have very tall shoulder belt guides. But! Booster training a kiddo who is very comfortable in their seat in harness mode using the same seat can be really helpful since the kiddo already knows the seat.
Important Information: Where to Find
Date of manufacture label: the seat has a 10 year expiration. The label is on the bottom of the seat’s base.

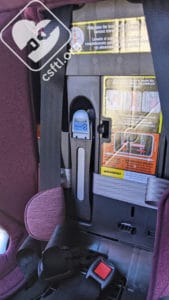
Graco Turn2Me manual storage
Manual storage: the manual stores in a slot at the bottom of the seat’s base.
Graco Turn2Me lower anchor storage
Lower anchor storage: the lower anchors store on the front of the seat behind a panel.
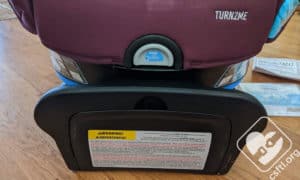
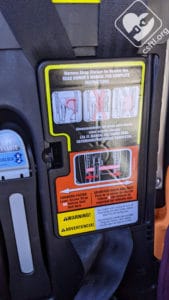
Graco Turn2Me FAA approval label
FAA approval label: the Turn2Me is approved for use on aircraft in forward facing harness mode only. It is not approved for airline use in rear facing mode.
The approval label is found on the front of the seat, on the panel where the lower anchors are stored.
Overall Thoughts
The Turn2Me has everything we’d expect from a Graco multimode car seat — it’s fairly easy to install, has a smooth harness, and has the potential to be fairly long-lasting. The turning portion of the program is pretty nice — the mechanism is very smooth. For families who are looking for a rotating seat, we’d definitely put the Turn2Me high on the list of rotating seats to consider!
Giveaway!
Read our terms and conditions, then enter below for your chance to win a Turn2Me of your own!
a Rafflecopter giveaway